In the previous tutorial, you learned how to install the QGIS STAC API Browser plugin. Now, let's learn how to use it.
Introduction to Using the QGIS STAC API Browser Plugin
Through STAC, you are able to access a large amount of diverse geospatial data. Using the QGIS STAC Plugin, you can easily search through all the data available through the STAC Browser. Once you have found your desired data, you can download or even directly add the data to your QGIS project.
This tutorial will walk you through how to access STAC data using the STAC API Browser QGIS plugin. For this example, we will be searching Microsoft's Planetary Computer. For our search area, let's use Microsoft's Seattle Headquarters and select only imagery from Landsat Collection 2 Level-2 in June of 2022.
Plugin Functionality
The plugin features can be categorized into two parts: (1) searching for STAC Items and (2) accessing STAC Assets.
(1) Search STAC Items
A STAC Item is the atomic unit of data that can be searched in STAC. Each item contains STAC Asset(s) (e.g., satellite imagery, derived data, DEMs). Typically, an item contains asset(s) that is/are often some form of imagery of the earth, but it could be any type of geospatial data. A STAC Item is cataloged with metadata that makes it highly searchable. Through the QGIS Plugin, you will be able to search by the datetime, geometry, and additional filters to find the data you desire.
To better understand the architecture of STAC, see the Intro to STAC Tutorial.
(2) Access STAC Assets
Within each STAC Item are one or multiple STAC Assets.
A "spatiotemporal asset" is any file that represents information about the Earth at a certain place and time. Usually, the asset includes a data file, a metadata file, and potentially additional helper files to better catalog the data. The data file of the asset is what you will be downloading or adding to your QGIS project.
After applying a STAC Item search, you will be able to view and download specific STAC Assets from the item's results.
Let's dive into applying the functionality of the QGIS STAC plugin to our example.
Add a STAC API Connection
By default, the STAC API Browser plugin provides some predefined STAC API service connections with the plugin's installation.
To add a new STAC API service connection, click the New button and add the required details.
The connection dialog box contains an API Capabilities field which can be used to set the connection to use
a SAS Token to authorize requests to Azure Blob Storage. While you are able to browse all STAC Items without authentification, some data providers require you to have authentification to download the data. This authentication is typically in the form of a free login. To learn more about the Microsoft SAS Token, visit Microsoft's documentation.
The image below shows the how to connect to the Planetary Computer STAC API.
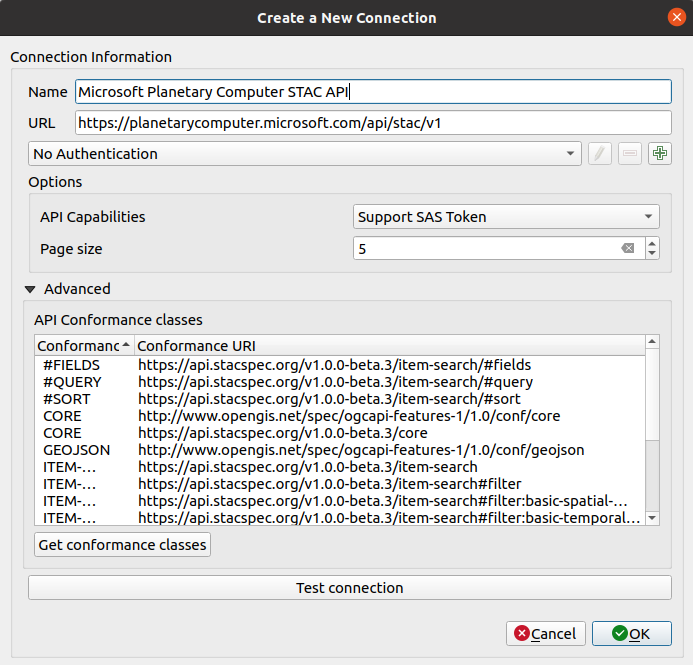 Connection dialog box with a Microsoft Planetary Computer STAC API details.
Once all the details have been filled in, click OK to save the connection.
Launch the STAC API Browser Plugin
From installing the plugin in the previous tutorial, there will be a plugin entry with the STAC APIs Browser icon in the QGIS toolbar. Click on the icon to open the plugin window.
 QGIS Toolbar (Version 3.26)
When you click on this icon, this window will pop up:
 STAC API Browser Window
You can also launch the plugin via the QGIS Plugins Menu as well as the QGIS Web Menu:
-
QGIS Toolbar > Plugins tab > STAC API Browser Plugin > Open STAC API Browser.
-
QGIS Toolbar > Web tab > STAC API Browser Plugin > Open STAC API Browser.
Search Items Using Search Filters
The plugin also allows you to utilize filters during your STAC Item object search to narrow your results.
Date Filter
Search for either a single temporal instance or for items within a temporal range of any size.
Fill out your desired date range in the Filter by date section.
For our example, select the following date range:
Start: 6/1/22 12:00 AM
End: 6/30/22 12:00 AM
Spatial Extent Filter
To define a spatial extent to filter your search results, you have a few options:
- Manually enter specific lat/long coordinates.
- Let QGIS calculate an extent from:
- Layer: a specific layer of your choice
- Layout Map: the map layout
- Bookmark: a predefined QGIS spatial bookmark
- Use the current Map Canvas Extent.
- Draw a box on the canvas of the area in which you would like to limit the search (Draw on Canvas button).
For our example, you can zoom into Seattle on your map, or enter the following coordinates:
N 47.9613, S 47.5469, W -122.2751, E -121.9613.
Search Box
Here is what your search box should look like to achieve the same results as this tutorial:
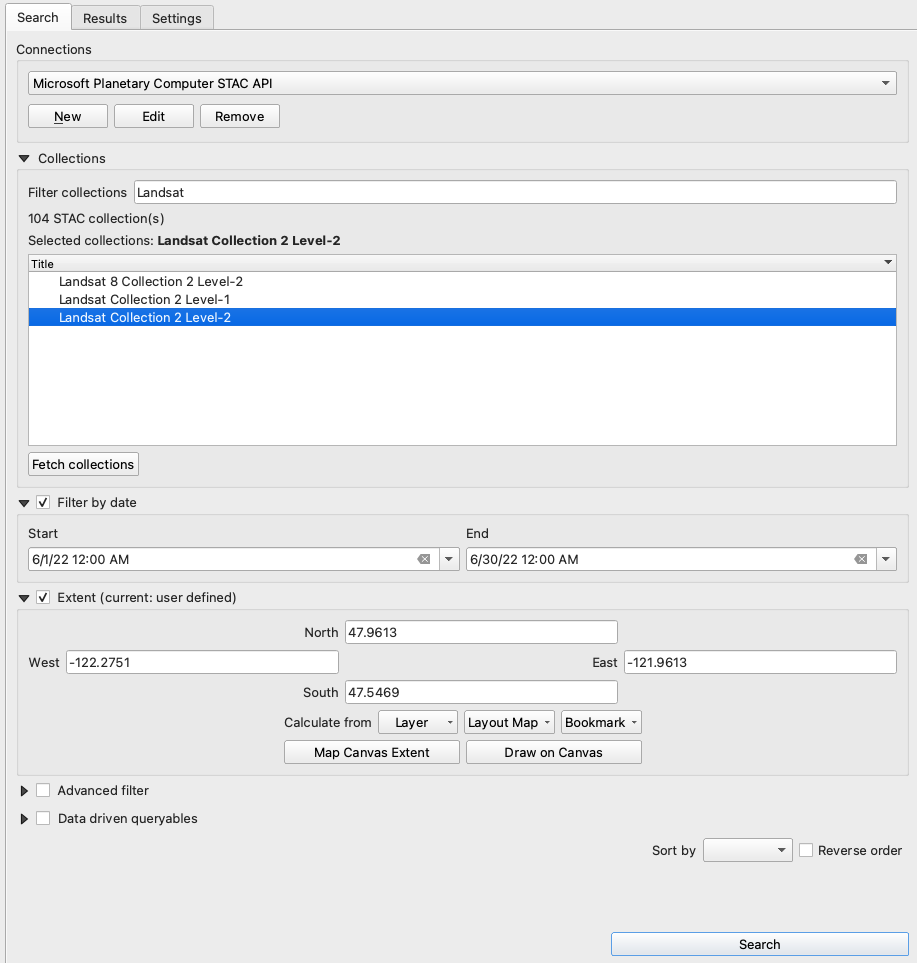 Search box with available filters selected.
NOTE: the box must be checked by a given filter for it to be used in the search.
View the Search Results
Once you have specified all the filters that you want to use to query the data, click on the Results tab to see a list of all the items that fit your search criteria. From here, you can select your desired item to explore. The thumbnail and the Date acquired provided in the preview box can help you decide your selection.
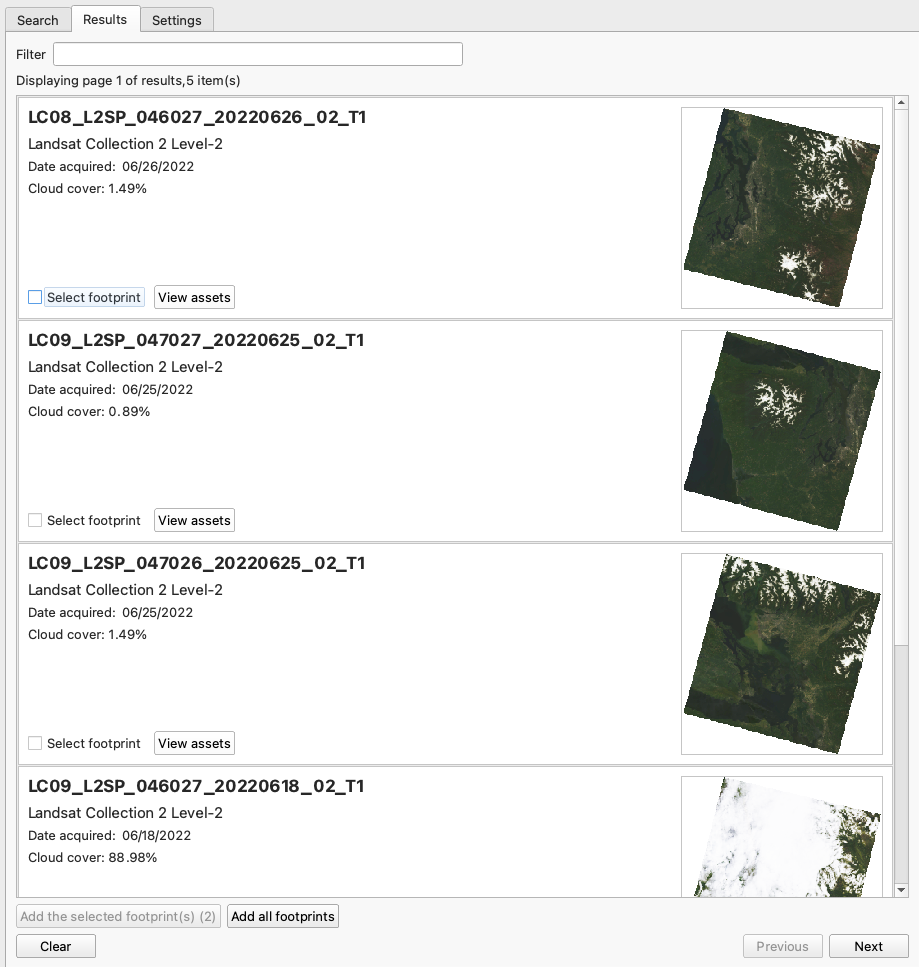 Example of items in search results.
View the Footprints and Assets
The plugin allows you to load the STAC Item's footprint and assets in QGIS as map layers.
Add the Footprints
You have the option to add the item footprint to the QGIS canvas, which allows you to see the outline of where the asset exists in space. The footprint gives you an idea of if this data will be in your area of interest and therefore allows you to evaluate the fitness of the data before adding it to your project or downloading the data.
This tool is particularly useful if you plan to download the dataset instead of using the COG layers in QGIS.
Click the Select Footprint button to add the footprint of the first three items to the QGIS canvas. The footprint map layer (simply an outline of the data’s extent) will be loaded into QGIS. Now, you can better see the spatial extent of this data.
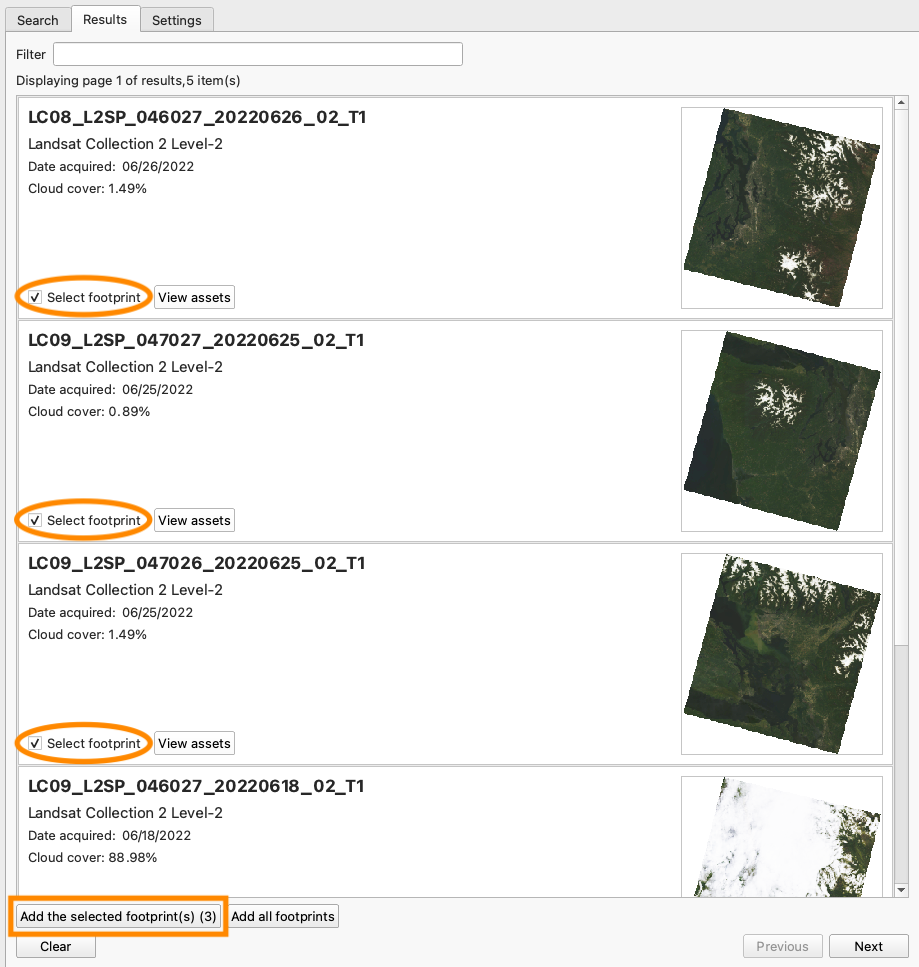 Image showing the button used for adding the STAC item footprint.
View the Footprints
Once you hit the Add the selected footprint(s) (3) button, you will see a box or outline of the image footprints appear on the QGIS map.
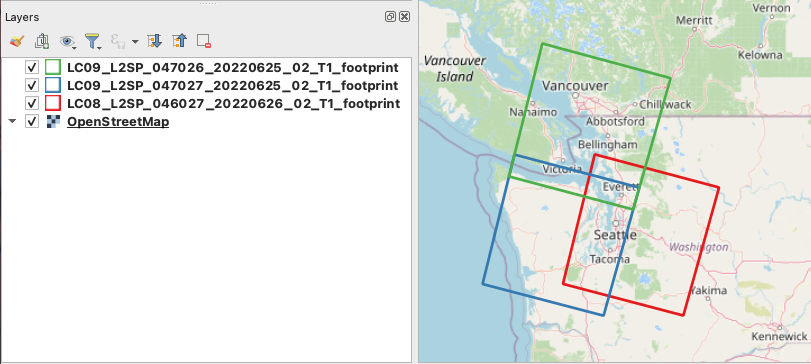 Image showing the 3 image footprints on the QGIS map.
Based on looking at these footprints, it appearsLC09_L2SP_047026_20220625_02_T1does not cover the area of Seattle we are targeting. Between the two that do cover Seattle, let's select the Landsat 9 image (the blue footprint:LC09_L2SP_047027_20220625_02_T1) over the Landsat 8 image (the red footprint:LC08_L2SP_046027_20220626_02_T1).
Add and Download the Item's Assets
The plugin currently supports loading assets as Cloud-Optimized GeoTIFFs (COGs) layers in QGIS. A COG is a GeoTIFF file that has been stored in a manner that makes it easier for you to access parts of the data that you need for your analysis without needing to download the entire file that includes areas in the GeoTIFF that are not of interest to you. Many STAC Catalogs have data stored as COG’s, but this is not a requirement of STAC and you are still able to download the entire GeoTIFF if that is your preferred method.
To add the assets to the QGIS canvas, click the View assets button from the required result item. This button will display a list of the available bands of the dataset.
 Image showing the button used for viewing the STAC item assets.
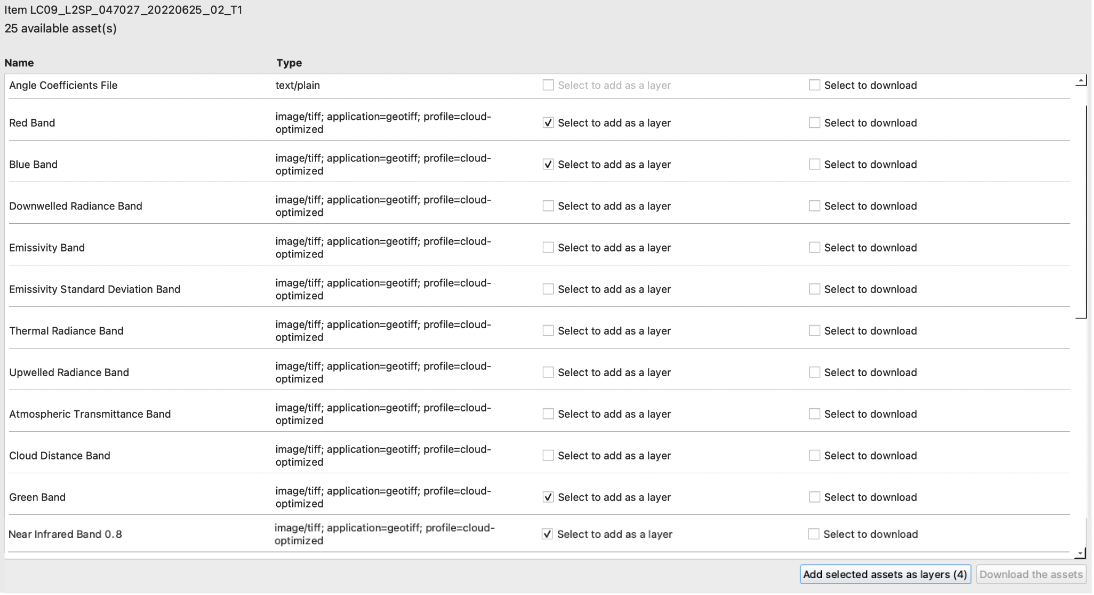
After clicking the View Assets button, the assets dialog box will open. From the asset list, check the Select to add as a layer box to add the item into the QGIS as a COG layer. To download the asset, check the Select to download box.
For this tutorial, we will be adding the Red, Green, Blue, and IR bands as COG layers directly to the map. See the figure below.
 Assets dialog box
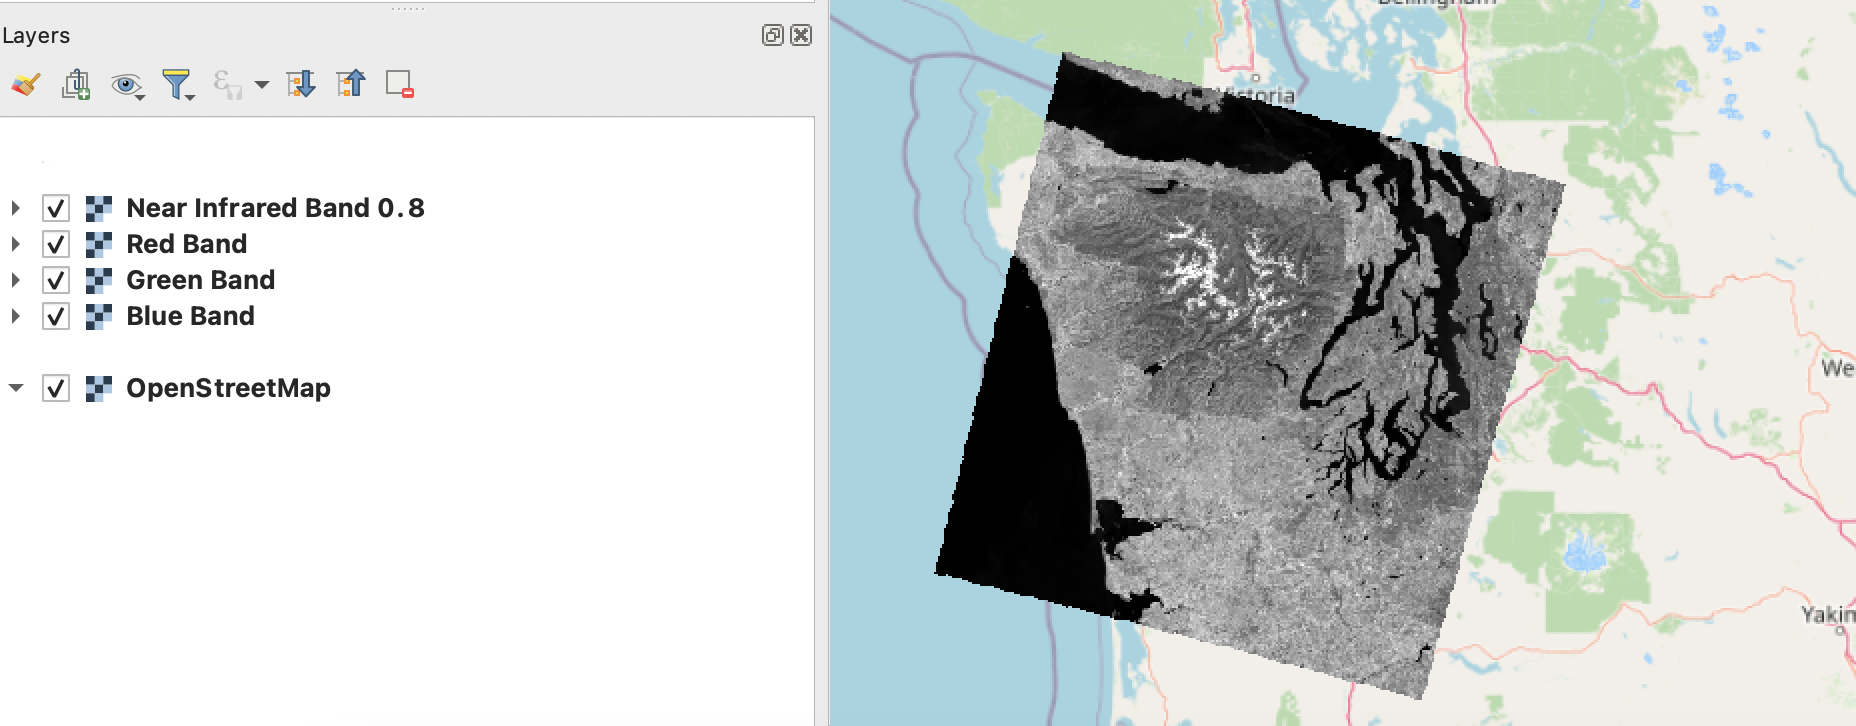
Below is the result of clicking Add selected assets as layers, which added the four selected assets to the QGIS map canvas. On the left of this image, we can see the four layers we added the map in the Layers legend. On the right of the image, we see the Near Infrared band image on top. Now, you can use QGIS to analyze this data.
 Asset added as a QGIS map layer.
You are now able to utilize the STAC API Browser plugin to add any datasets available through the STAC API Browser to your QGIS projects.
Join the conversation
If you have any questions or run into any issues, you’re welcome to get involved.